Updated on Aug. 18 | 2025
Welcome to our comprehensive guide to STL files! We provide practical tips to help you work with STL files. Here, you can learn how to expertly manage STL files, improve your 3D printing skills, and ensure your projects run smoothly!
You can upload your STL files on our Squote, and our engineers and customer success managers can help you troubleshoot errors or printing limitations on your files for free!
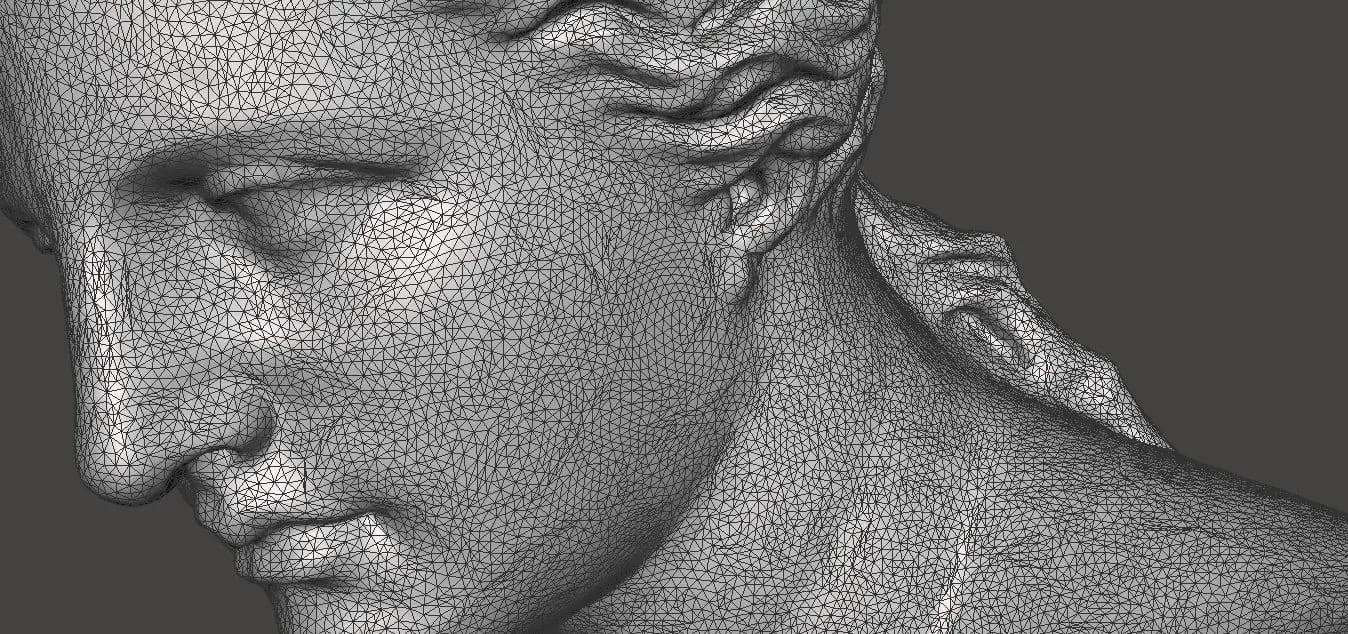
Image Source: Formlabs
What is a STL file?
The STL (stereolithography) file format is a widely used file format for 3D printing. It represents the surface geometry of a three-dimensional object without any color, texture or other attributes. STL files use a series of triangles (faces) to describe the shape of a 3D object. It is popular for its simplicity and compatibility with most 3D printers and CAD software.
How to reduce STL file size?
Reducing the size of STL files can help improve processing speed and efficiency without sacrificing the quality of your 3D prints.
Here are some tips for reducing STL file size:
1. Decimation: Use software tools to reduce the number of polygons in your 3D model. Recommended tools: MeshLab, Blender.
2. Compression: Some 3D modeling software offer STL file compression features that can significantly reduce file size by optimizing the data.
3. Resolution Adjustment: Reducing the resolution or level of detail of a 3D model when exporting can reduce the file size. This method is suitable for large models that do not require fine details.
4. Remove Unnecessary Details: Simplify your model by removing any small or hidden features that will not affect the final print.
5. Binary Format: Save your STL file in binary format instead of ASCII. Binaries are more compact, reducing file size by about 80%.
Why does STL file export with no details?
1. Resolution Settings: When exporting, low-resolution settings result in a lower number of triangles, thus reducing the detail of the 3D model. Make sure to select the high-resolution setting to get more intricate details.
2. Simplification: Some software automatically simplifies models to reduce file size, which may result in loss of fine details. Please check your export settings to avoid unnecessary simplification.
3. Model Complexity: The software may simplify extremely complex models for easier processing, which may strip away the finer details. Using a more powerful program or adjusting the complexity parameters may help.
4. File Format Limitations: STL files capture only surface geometry without color or texture information. If your model relies on these properties, consider using a format that supports them, such as OBJ or 3MF.
How to export textures with STL?
1. Use OBJ Format: OBJ files can store texture and color information as well as geometry. You can export your model from 3D modeling software as an OBJ file to include textures.
2. Texture Mapping: Apply textures to your models in your 3D modeling software (Blender or MeshLab) before exporting.
3. Use Accompanying Files: Some 3D printing workflows involve using a combination of files. Export geometry as STL and use accompanying files such as PNG or JPEG for texture information.
4. Software-Specific Solutions: Some 3D printers and slicers have proprietary formats that support textures. Check if your hardware supports such formats and use the appropriate software to export your model.
How to edit an STL file in SolidWorks?
1. Import the STL File: Open SolidWorks and go to File > Open. Navigate to your STL file and select it. The file will be imported as a surface body.
2. Convert to a Mesh Body: Right-click on the imported STL file in the FeatureManager tree and select Convert to Mesh Body. You can use the grid directly in this way.
3. Edit the Mesh: Use the Segment Imported Mesh Body feature to break down meshes into smaller, more manageable segments. You can then modify the geometry using tools such as fillets, chamfers, or holes.
4. Create Solid Bodies: Use the Surface From Mesh tool to create solid bodies from the mesh so that you can use boolean operations like Cut, Combine, or Add.
5. Refine the Model: Make any additional modifications using SolidWorks’ standard modeling tools, such as sketching and extruding.
6. Save Your Work: Once you are satisfied with your edits, save your file as an STL or SolidWorks part file.
What can I use to open STL files?
There are many tools and software options available to open STL files, such as:
1. 3D Viewer: A built-in application in Windows 10 and 11, 3D Viewer allows you to easily open, view, and inspect STL files.
2. MeshLab: An open-source free software designed for processing and editing 3D meshes. MeshLab is great for viewing and manipulating STL files.
3. Blender: A powerful, open-source 3D modeling tool that supports STL files. Blender provides extensive features for viewing and editing 3D models.
4. TinkerCAD: A free web-based application that allows you to open, view, and edit STL files directly in your browser. It’s user-friendly and great for beginners.
5. Cura: A popular slicer software for 3D printing that can open STL files and prepare them for printing.
6. SolidWorks: A professional-grade CAD software that can import and edit STL files, providing advanced tools for precise modifications.
7. Magics: Developed by Materialise, Magics is a powerful data preparation and build optimization tool. It allows you to open, edit, repair, and optimize STL files.
How to create a STL file?
Start by designing your model using 3D modeling software like Blender, TinkerCAD, or SolidWorks. Check for problems such as holes, non-manifold edges, or intersecting geometry and use software tools to fix them to ensure your model is complete. Once you're done, go to the export options (usually under File > Export) and select STL as the format. Adjust settings such as resolution or file type (ASCII or binary) as needed, and save the STL file to the desired location. Your file is now ready to be imported into slicing software for 3D printing.
How to convert STEP file to STL?
Converting an STEP file to an STL file is very simple using various tools such as Autoconverter, MeshLab, or online converters like AnyConv. Begin by launching your software of choice and opening the STEP file; you can usually drag and drop the file or use the file selection option. Adjust settings such as mesh tessellation quality to balance detail and file size. Continue with the conversion, which will generate an STL file from the STEP file, and then save the STL file to your desired location.
How to convert DAE file to STL?
First open the DAE file in compatible software such as Blender, MeshLab, or TinkerCAD. After loading the file, make sure the model appears correctly and make any necessary adjustments or repairs. In the Export options, select STL as the desired format and adjust settings such as Resolution or File Type as needed. Go ahead and export, and save the STL file to your preferred location.
How to convert STL file to G-code?
Converting an STL file to G-code is a critical step in preparing your 3D model for printing.
You can use slicing software to convert your 3D models into instructions that your 3D printer can understand. Choose slicing software such as Cura, PrusaSlicer, or Simplify3D, and import the STL file you want to convert. Configure print settings according to your requirements, including layer height, print speed, infill density, and support structures.
After configuring the settings, use the Slicing feature to generate G-code, which converts the 3D model into a series of instructions that direct the printer layer by layer. Finally, save the G-code file to your computer or directly to a memory card, depending on your printer's requirements.
How to create STL file from JPG?
Creating an STL file from a JPG requires the use of an online tool or software that can convert a 2D image into a 3D model. An easy way is to use an online converter like ImageToStl or AnyConv.
Start by uploading your JPG file to the converter. You can then adjust settings such as size and extrusion options to control the detail and size of your 3D model. After configuring the settings, click the Convert to STL button, and the tool will generate the STL file for you. Download the STL file for 3D printing or further editing in CAD software.
How to convert OBJ file to STL?
First open the OBJ file in a compatible software such as Blender, MeshLab, or TinkerCAD. After loading the file, check the model to ensure it displays correctly and make any necessary adjustments. In the Export options, select STL as the desired format. If necessary, adjust any relevant settings, such as resolution or file type. Go ahead and export, and save the STL file.
How to modify STL files?
1. Choose Software: Programs like Blender, MeshLab, and TinkerCAD are popular choices for editing STL files. These tools are free and offer powerful editing capabilities.
2. Import STL File: Open the software of your choice and import the STL file you wish to modify, usually done through the File > Import menu.
3. Edit the Model: Use the software’s tools to make your desired changes. You can add or remove geometry, resize parts, or adjust details. For example, in Blender, you can go into edit mode and manipulate the mesh directly.
4. Repair the Mesh: After editing, make sure the mesh has no errors, such as non-manifold edges or holes. Most software provides automatic repair tools to fix these problems.
5. Export the Modified File: Once you are satisfied with the modifications, export the model as an STL file. Go to File > Export and select STL as the format.
Can I check dimension using STL file?
Yes, you can use the STL file to check the dimensions. While STL files are primarily used to describe the surface geometry of a 3D model, many 3D modeling software and viewers have tools that allow you to measure distances, angles, and dimensions directly on the STL model.
Why is STL file printing in mirror?
STL files may print in a mirrored manner due to the mirror settings in your slicing software. Programs such as Cura, PrusaSlicer, and Simplify3D have mirror options that flip the model along a specified axis. If this option is enabled (either intentionally or by default), it may cause the model to print inverted. To resolve this issue, double-check the mirror settings in your slicing software before printing. Additionally, incorrect model orientation or file import issues can also cause mirrored printing. Ensuring proper alignment and agreement between your design and your slicing software can help prevent this problem.
Can I edit STL files online?
Yes, you can edit STL files directly in your browser. Online tools range from simple repair and mesh cleanup utilities to full-fledged 3D modelers that support boolean operations, sculpting, and parametric workflows.
Different platforms cater to different skill levels. If you just need quick fixes or basic shape tweaks, lightweight editors will suffice. For more advanced edits—like smoothing, subdivision, or converting meshes into solid bodies—you’ll want a more powerful web-based CAD environment.
|
Tool |
Editing Style |
Skill Level |
Cost |
|
TinkerCAD |
Boolean/primitive shapes |
Beginner |
Free |
|
SculptGL |
Brush-based sculpting |
Beginner |
Free |
|
3D Slash |
Voxel/block editing |
Beginner |
Free/Paid tiers |
|
Vectary |
Parametric + mesh editing |
Intermediate |
Free/Paid |
|
SelfCAD |
All-in-one CAD & slicer |
Intermediate |
Trial → Subscription |
|
Onshape |
Parametric CAD (limited mesh) |
Advanced |
Free/Public or Paid |
How to transfer STL file to SD card?
1. Prepare the SD Card
Use an SD or microSD (with adapter)
Format as FAT32 (or exFAT if >32 GB and supported)
2. Connect to Your Computer
Insert the card into your reader
Wait for it to appear in File Explorer (Windows) or Finder (macOS)
3. Copy the STL File
Locate your .stl in Downloads or your save folder
Drag & drop (or Copy/Paste) into the card’s root or a “models” folder
Rename to <20 characters, no spaces/special symbols
4. Safely Eject the Card
Windows: Right-click the drive → Eject
macOS: Click the eject icon in Finder
Wait for confirmation before removing
5. Print from the SD Card
Insert into your 3D printer (power off/on if required)
Navigate to “Print from SD”
Select your STL (or pre-sliced G-code if needed)
Tip: If your printer doesn’t accept raw STL, slice in Cura or PrusaSlicer first and transfer the G-code instead.
How to convert 3MF file to STL?
1. Choose Your Tool
Desktop app (MeshLab, FreeCAD, Microsoft 3D Builder, Blender)
Slicer (Cura, PrusaSlicer)
Online converter (AnyConv, 3DConvert, Aspose 3D)
2. Open or Upload the 3MF
Desktop: File → Import or Open… → select your .3mf
Slicer: File → Open File(s)… → select your .3mf
Web: Go to the converter site → Upload your .3mf
3. Export or Download as STL
Desktop/slicer: File → Export or Save As… → choose “STL (*.stl)”
Online: Select STL output format → Click Convert → Download the .stl
4. Verify the Conversion
Re-open the STL in your slicer or mesh viewer
Check scale, orientation, and mesh integrity
Can AI create STL files for 3D printing?
Absolutely. Modern AI can spin up 3D geometry and export it as an STL ready for your printer. Depending on your needs—quick concept sketches, organic sculptures, or engineering-grade parts—you can pick from a variety of AI-powered solutions.
|
Tool |
Input Type |
Strengths |
Output Quality |
Cost |
|
DreamFusion |
Text prompt |
Highly detailed, organic forms |
High (manifold) |
Free/Open research code |
|
Point-E |
Text prompt |
Lightning-fast, Python-friendly |
Medium (needs cleanup) |
Free from Meta |
|
Kaedim |
2D image → 3D |
Game-ready models |
Moderate to High |
Paid subscription |
|
Autodesk Generative Design |
CAD constraints |
Engineering-grade parts |
Very high (B-rep) |
Subscription |
|
Sculptron |
Sketch or image |
Artistic sculpting workflow |
High (requires refinement) |
Free beta |
Pros and Cons of STL Files
|
Pros |
Cons |
|
Broad compatibility with nearly all slicers and CAD tools |
Lacks color, texture, and material data |
|
Simple, open format based solely on triangle meshes |
No built-in units—scale must be inferred or recorded separately |
|
Binary variant offers compact file sizes |
Only represents surfaces—no solid bodies or feature history |
|
Easy to parse and generate programmatically |
Large meshes can lead to huge files and slow processing |
|
Well-established standard for 3D printing workflows |
Doesn’t capture assembly structure or parametric details |
 0
0


COMMENTS
- Be the first to share your thoughts!